Wednesday 12 October 2016
Quick Update
Despite the fact that the school year is over, I am still posting blogs. Currently I am waiting for a laser cutter to cut some wooden boards. Due to that, I haven't been able to make any progress. As soon as that happens, I will update you. Thank you for your patience.
Friday 22 April 2016
A Little Bit Further
 |
| My computer |
If you're wondering why I wasn't posting anything or haven't been making any progress on the printer lately, it's because my computer was broken. In fact, after we fixed it, all of the files were gone. Thankfully all of my 3D printer files and work was all recoverable from the internet as well as backed up on multiple computers so I don't have to redo the entire bill of materials. Speaking of which, I've managed to finish the rest of the bill of materials for the extruder. The revised copy can be found here. The new section is located at the bottom under the Wade's Extruder tab at the bottom. All that's left to do now is order in the parts. I'd like to say thank you to A.R.R. Mechanical Services for making me a piece of M8 by 20mm piece of rod that was nearly impossible to find. They have been a tremendous help in part sourcing as well. You can find a link to their Facebook page here. Thanks Andy.
Aside from the progress on the BOM, I'm happy to have my computer back up and running which means that hopefully this weekend we can sit down and order some parts, build, and make some progress. I've finally found a provider for the correct kinds of belts that we need, which is exciting. We're falling a bit behind due to design changes and technological issues, but we'll keep working until we finish it.
In other good news, I should be able to write blog posts fairly regularly again now that my computer is fixed. I think that's about it for now, however. I'll be sure to put out an update if anything exciting happens. Thanks to everyone else for continue to reading about my progress and continuing to through the recent technical difficulties. If you have any comments, questions, or concerns, please post them in the comment section below. Thanks again!
Mattel is Entering the 3D Printing Field
 |
| Mattel's Thingmaker |
Mattel is one of the leading toy companies in the world. Now, they're interested in the 3D printing business too. Mattel has now unveiled their newest product, a 3D printer for kids to make their own toys. The printer is priced at $300 dollars and is just large enough to be used to print parts for toys. The printer is available to pre-ordered now, and production is expected to start in fall of 2016. The idea behind this printer is that kids can print snap-together pieces, just like a conventional 3D printer, and have an infinite number of choices for what they want to create. The printer comes equipped with additional safety features as well, including a locking door and a retractable extruder to prevent children from injuring themselves. The printer is controlled through an application for iOS and Android devices used to send pieces to the printer. The app comes with pre-made parts, however parts can also be built using 3D modeling as well. The app also allows for the parts to swivel around so you are able to see how they work as well. If you'd like to know more about this product, you can find a link here.
If you have any comments, questions, or concerns please post them in the comments section below. Thanks for reading!
Thursday 14 April 2016
Technical Difficulties
Hi there,
Due to the fact my computer is currently under maintenance, I can't access the building instructions or write blogs easily.
I'll make sure to let everyone know if the status of anything changes.
Due to the fact my computer is currently under maintenance, I can't access the building instructions or write blogs easily.
I'll make sure to let everyone know if the status of anything changes.
Tuesday 29 March 2016
Another Large Posting Delay

Hello everyone!
First off, I apologize for the delay of my blog posts. I went away for the march break to Virginia, U.S.A. to take a tour of the many large military bases located in Norfolk. Driving there in a coach bus was sixteen hours both ways, so if I had written a blog post over the march break, it wouldn't have been the highest quality content. I decided to write mostly about my trip today because I haven't made much progress on the building aspect.
First off, I apologize for the delay of my blog posts. I went away for the march break to Virginia, U.S.A. to take a tour of the many large military bases located in Norfolk. Driving there in a coach bus was sixteen hours both ways, so if I had written a blog post over the march break, it wouldn't have been the highest quality content. I decided to write mostly about my trip today because I haven't made much progress on the building aspect.
I woke up at 4:00 in the morning on Saturday 12th. Then, made it to the Georgetown armory building for 6:00. I was going with part of my Cadet squadron and two other squadrons of Cadets. Cadets is a dynamic, structured youth program that offered Canadian youth a variety of interesting and challenging activities. That's the definition of the Cadet program that I found on the Cadets website.
We left the museum at 4:00 and it started raining while we were going to the buses. We were soaked by the time we went back to the museum. The buses came to pick us up instead of us going to them, and we left for the last time at 4:30. We went to Naval Base Oceana, or NAS Oceana to eat dinner at the Mess Hall there. A mess hall is a cross between a high school cafeteria and a fancy restaurant. Sadly I don't have any photos of the mess because I wasn't allowed to take pictures inside. I also couldn't find anyone else who took a photo of it either. After we ate at the mess, which is where we ate for the rest of the week, we went back to the barracks and had some free time. Lights out was at 9:00 and we slept for about eight hours.
Next was a bag search to make sure we didn't have any contraband. Thankfully, no one brought any contraband, so we had no issues and waited until 8:00 for the bus to arrive so we could start loading bags and leave the armory. We were on the bus for about five hours at a time and sixteen hours total. We stopped only for lunch and dinner. Then, we arrived at our barracks.
 |
| Our Barracks for the Week |
In a way, our barracks were somewhat a piece of history. They were World War Two barracks with the same layout and furniture as World War Two aside from there being more power outlets and more modern lighting. Single beds and barrack boxes. Barrack boxes are quite simple. They're a locking box with two small boxes inside that can be removed to access a lower compartment.
 |
| A Barrack Box or Footlocker |
The day after we arrived, we loaded onto the bus at 10:00 and headed to the Nauticus naval museum, where they have many interesting exhibits. My personal favorite was the U.S.S. Wisconsin or BB-64. It's not a model, but the real thing. The U.S.S. Wisconsin was one of four Iowa-class battleships, or fast battleships, made by the United States. It was capable of attacking both air and ground targets. However, it could also launch small planes off of it's deck.
 |
| The U.S.S. Wisconsin |
Day Two arrived early with a wake up time of 6:00 in the morning. We were on the bus heading for the mess at 7:00 for breakfast. We were out of the mess and back on the bus for 8:30. Next was an uneventful bus tour of Naval Station Norfolk. I saw two interesting things on the tour. One was an aircraft carrier that I couldn't take pictures of and another was surprisingly a series of pipes carrying steam all over the base. Instead of using gas or oil for heat and water, they use steam. It's significantly more efficient and saves millions of dollars in power each year. We headed back to the mess for dinner and went to bed.
 |
| One of the steam pipes |
The wake up time on day three was at 6:00 and we were on the bus for 7:00. Then we were leaving the mess at 8:30. That part will remain the same through the rest of the trip. After we left the mess, we headed off to a survival training center for navy personnel and pilots. They had many cool devices and classrooms there including a virtual reality parachute simulator, a pressure chamber and a dunking chamber. The dunking chamber is the most complicated of all of these devices to understand. The chamber is suspended from a large crane over a pool with about five people in it. The crane dunks the chamber into the pool. The idea is that it simulates a plane crash into the ocean to train the pilots to escape from their restraints.
 |
| The Dunking Chamber |
The chamber is capable of simulating a helicopter crashing as well. The only difference is that the dunk chamber flips upside down instead of remaining upright because helicopters are more top heavy so they flip over underwater.
The next day, we went to a naval museum with many original planes from various wars including the B25 Mitchell Bomber, the Avro 504k trainer plane, and one of two Mosquitoes remaining in flying condition in the world. Surprisingly, the Mosquito was a Canadian built plane made entirely out of wood. It's difficult to tell, and the time period doesn't exactly match up with the material, however during World War Two the Allied Forces were running out of metal. Luckily, a Canadian named Ronald Eric Bishop came up with a solution. He made an extremely fast, extremely light and extremely versatile plane, the Mosquito. This plane was adapted to be a bomber, a fighter, and a bomber-fighter plane.
The day after that was split into two parts. The first part of the day, we went to Virginia beach and did some shopping which was extremely uneventful. Many people in our group were surprised by the fact that swearing in public is illegal in Virginia.
 |
| The Mosquito |
 |
| A No Swearing Sign |
The second part of the day, something really interesting happened. We went to go see some LCACs, or Landing Craft, Air Cushions. The simplified term would be hovercraft. With a unit cost of 23 million dollars apiece, the LCACs are capable of carrying up until about 60 tons worth of cargo and travelling at about 60 knots at the same time. They are incredibly large pieces of machinery that are operated by a crew of six. We took a tour of one, however they are mostly just a large shipping container sitting on inflatable airbags. Somehow, they still manage to be amazing. They are also extremely durable. In testing, it took around twenty RPGs to take it down. Even after that, however, it took two hours to sink below sea level.
 |
| A deflated LCAC |
The day after, I got to see an extremely large amount of F-18s, most likely close to six billion dollars worth of aircraft in one place. The aircraft that I saw were equivalent to the ninth largest air force in the world. They were quite large and magnificent to look at.
 |
| An F-18 |
The next day, we were on the bus heading to Canada for 6:00. We stopped for only meals and an occasional bathroom break. We arrived early the next morning at 2:00.
Overall, I can't complain about the trip. It means I'm a week behind schedule, but I think that it was worth it. I'll try and accomplish some more work before the end of this week. Hopefully, I'll be all caught up by then.
Thanks to everyone for reading, and have a nice week! As always, if you have comments please post them and I'll respond as quickly as possible.
Wednesday 2 March 2016
More Progress and Even More Photos
Hi there,
First things first, I'm the realest.
The start of this blog might look a bit different. That's because I'd like to talk about a variety of different things that link to a variety of different images. All of the parts depicted below will come together to form this:
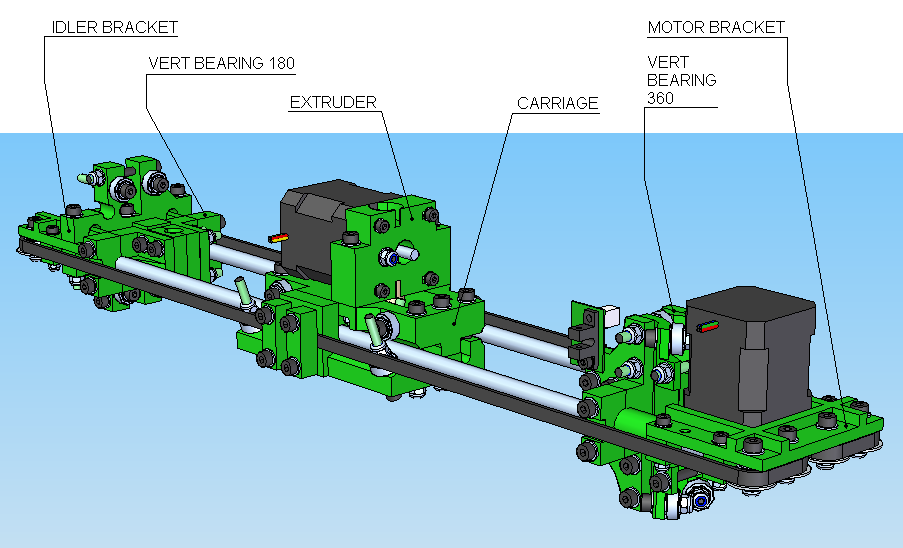 |
| A computer model of the X Axis for the 3D printer |
With that said, let's get started!
 |
| Our progress this week |
The above image is a picture of the fully constructed idler bracket which, as you can see in the computer model, holds the rods in place. The part indicated by the black arrow holds in the smooth rod. This part also allows the x axis of the printer to move up and down on the z axis using the bearings indicated by the red circle. The last important thing to note about this image is the bearing and somewhat larger than normal washer indicated by the green arrow. The large washer is an M4 mudguard washer, and the bearing is a 624 roller bearing. The bearing allows a belt to run freely from one side of the x axis to another, while the mudguard washer stops the belt from slipping off.
 |
| The issue we encountered |
 |
| The improved carriage |
This image is the finished extruder carriage. It is the two parts in the blog from two weeks ago combined. You will notice that there is a golden printed part circled in black. That would be a part for an opto-flag that we printed out. It is held in place by a screw, and when the other part of the x opto-flag is attached to it via the two holes in it, the flag will block a beam of light. I talked about this concept in my last blog.
 |
| The extruder block |
This part is the first printed part for the extruder. In the image, you can see the extruder block and a 604 skateboard bearing. There are, however, two bearings. One of them is visible and the second one is in the same position on the other side. We had to hammer the bearings in due to an extremely tight fit, and we will have to ream out the hole in the center so that we can fit an M4 piece of smooth rod through the center. The extruder in the image at the top of the blog is inaccurate due to the modified version of the extruder we are using, however the extruder still mounts in a similar way. The modified extruder is called Wade's extruder and the plans for it can be found here.
 |
| Both bearings are visible in this image |
As you may be able to tell, we encountered another issue here. The screw, circled in black, interferes with the positioning of the extruder block. From here, we have two decisions. We can order a shorter screw online, or we can relieve the extruder block so that the screw can fit into it. We are currently unsure of how to proceed, although we have some time to decide because we're not looking at building the extruder until we order parts for it.
 |
| All of the assemblies we have put together |
This last image gives you a decent idea of how everything we currently have fits together.
That's it for this week. It's possible that I could have another technology related blog post this week, but at this point I'm unsure. If you have any comments, please leave them in the comments section below.
Thanks again for reading, and have a nice week!
Tuesday 23 February 2016
Progress
 |
| Part of the progress on the build so far |
First things first, I'd like to apologize for not posting any blogs for the past few weeks. It has been quite busy recently, in terms of working on building, schoolwork, and many other things as well.
However, quite a bit of progress has been made on the build. As you can see from the picture above, we have started assembly. In fact we have made a tiny bit of progress since the picture was taken, but an issue has been encountered with some parts. We encountered this issue when we changed the extruder design from the original Mendel extruder to Wade's extruder because it functioned better. That means that before we can continue building, we need to order more parts. We also decided to change the opto-flag system to a 3D printed design which will accomplish the same thing with increased rigidity.
The opto-flag system uses a set of three flags that, when moved to a certain position by the motors, block a beam of invisible infrared light, telling a computer to stop the motor from moving. Think of the safety mechanisms on most garage doors. There's a beam of light that shines across to a light sensor. When an object, the equivalent of an opto-flag, passes through the beam of light, the light receiver stops receiving light, and makes the garage door stop, or go back up depending on your garage door. The opto-flag operates on the same principle; it stops the motor from crashing into the side of the printer and damaging the frame. Having a flimsy piece of metal for the opto-flag is most likely not the best idea.
I'll try to keep up on the blog posts from now on, especially now that we've started building. That does it for this now though, so have a good week. If you have any comments, post them below and I'll get right back to you.
Thanks for reading!
Subscribe to:
Posts (Atom)